How To write Basic Query in SQL | Writing
Query in Database
Essentially, SQL language allows us to retrieve and manipulate data on the data tables. In this article, we will understand and gain the ability to write fundamental SQL queries. At first, we will take a glance at the main notions that we need to know about in order to write database queries.
What is the T-SQL?
SQL is the abbreviation of the Structured Query Language words and, it is used to query the databases. Transact-SQL (T-SQL) language is an extended implementation of the SQL for the Microsoft SQL Server. In this article, we will use the T-SQL standards in the examples.
What is a Relational Database?
Most simply, we can define the relational database as the logical structure in which data tables are kept that can relate to each other.
What is a Data Table?
A table is a database object that allows us to keep data through columns and rows. We can say that data tables are the main objects of the databases because they are holding the data in the relational databases.
Assume that we have a table that holds the history class students’ details data. It is formed in the following columns.
Name: Student name
SurName: Student surname
Lesson: Opted lesson
Age: Student age
PassMark: Passing mark
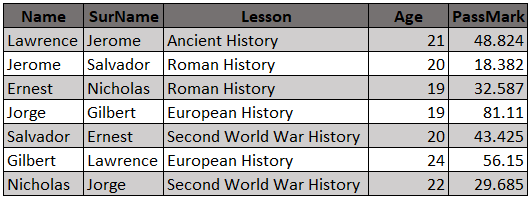
We will use this table in our demonstrations in this article. The name of this data table is Student.
Our First Query: SELECT Statement
The SELECT statement can be described as the starting or the zero point of the SQL queries. The SELECT statement is used to retrieve data from the data tables. In the SELECT statement syntax, at first, we specify the column names and separate them with a comma if we use a single column we don’t use any comma in the SELECT statements. In the second step, we write the FROM clause and as a last, we specify the table name. When we consider the below example, it retrieves data from Name and Surname columns, the SELECT statement syntax will be as below:
1 2 3 | SELECT Name ,SurName FROM Student |
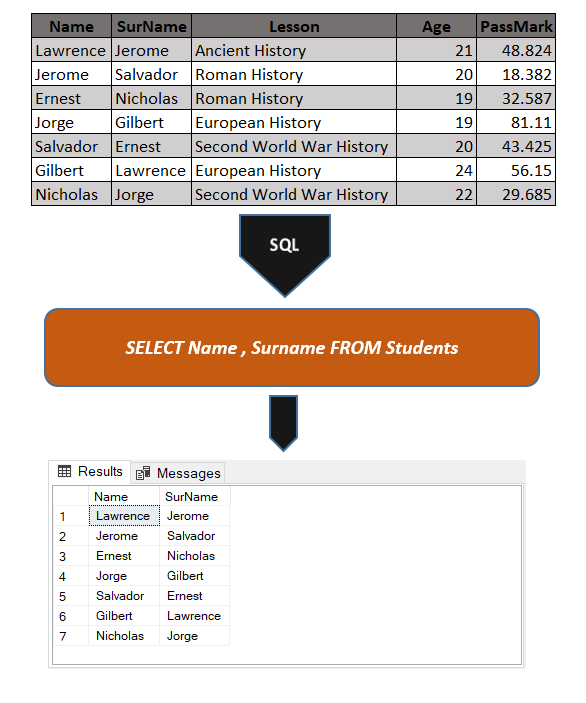
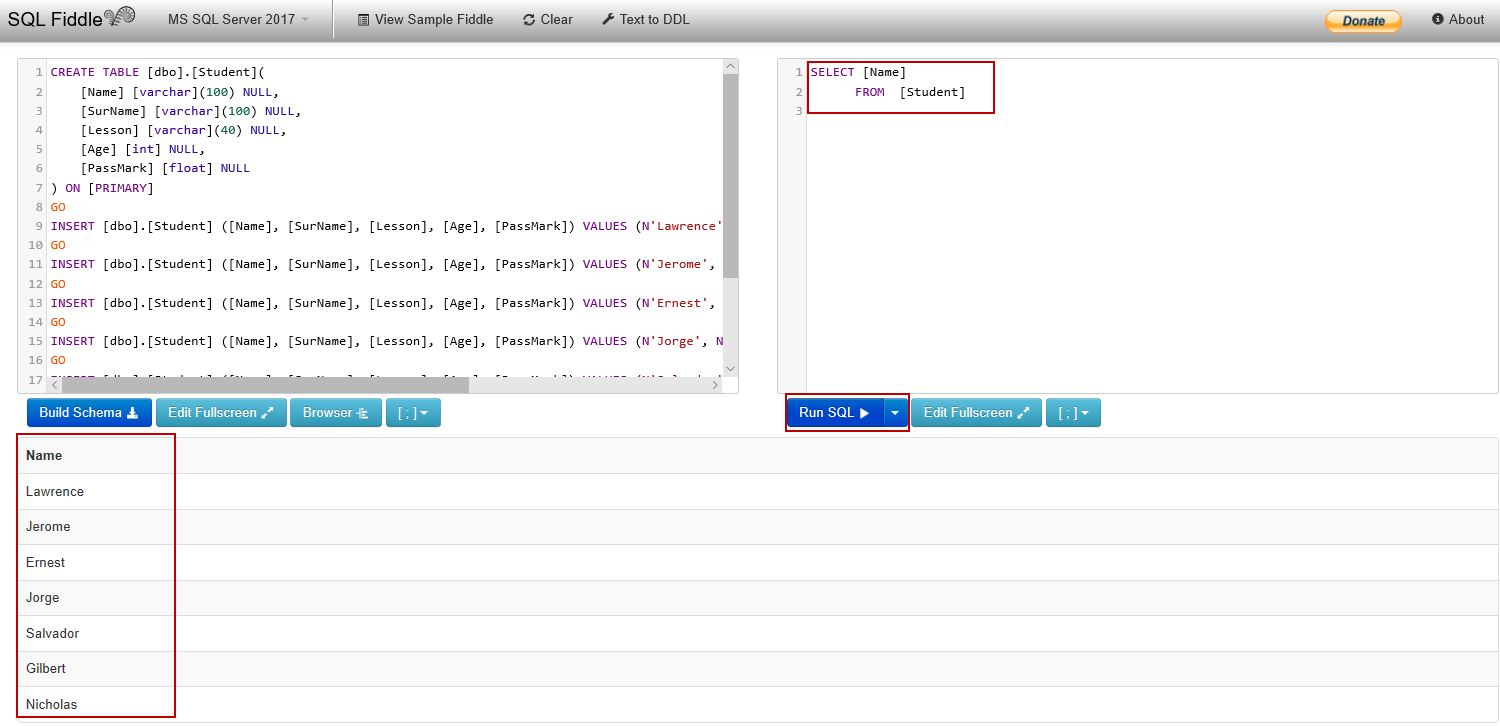
If we want to retrieve data from only the Name column, the SELECT statement syntax will be as below:
1 2 | SELECT Name FROM Student |
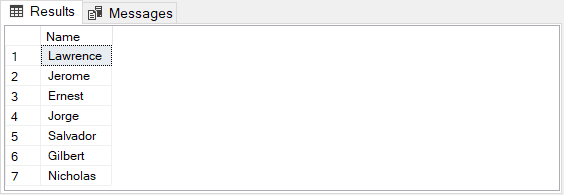
Tip: We can easily try all these examples in this article by ourselves in the SQL Fiddle over this link. After navigating to the link, we need to clear the query panel and execute the sample queries.
The asterisk (*) sign defines all columns of the table. If we consider the below example, the SELECT statement returns all columns of the Student table.
1 2 | SELECT * FROM Student |
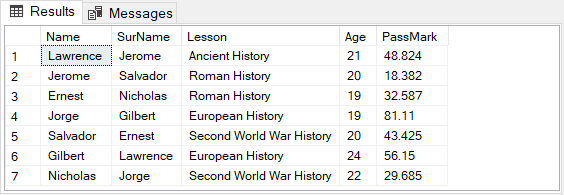
- Tip:
- Our main purpose should be to get results from the SQL queries as soon as possible with the least resource consumption and minimum execution time. As possible, we have to avoid using the asterisk (*) sign in the SELECT statements. This usage type causes the consume more IO, CPU and Network cost. As a result, if we don’t need all columns of the table in our queries we can abandon to use asterisk sign and only use the necessary columns
Filtering the Data: WHERE Clause
WHERE clause is used to filter the data according to specified conditions. After the WHERE clause, we must define the filtering condition. The following example retrieves the students whose age is bigger and equal to 20.
1 2 3 | SELECT * FROM Student WHERE Age >=20 |
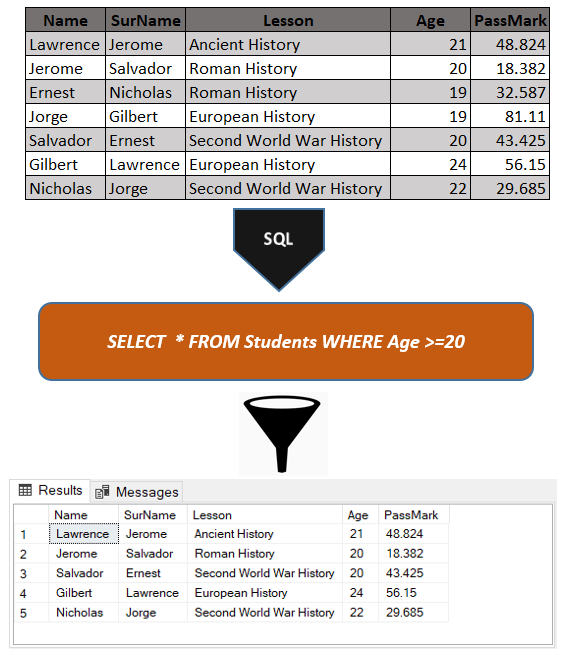
LIKE operator is a logical operator that provides to apply a special filtering pattern to WHERE condition in SQL queries. Percentage sign (%) is the main wildcard to use as a conjunction with the LIKE operator. Through the following query, we will retrieve the students whose names start with J character.
1 2 3 | SELECT * FROM Student WHERE Name LIKE 'J%' |
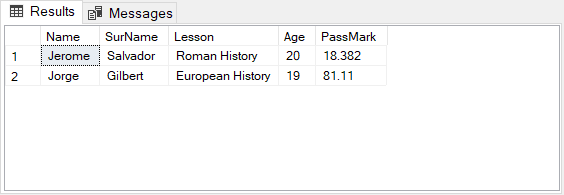
IN operator enables us to apply multiple value filters to WHERE clause. The following query fetches the students’ data who have taken the Roman and European History lessons.
1 2 3 | SELECT * FROM Student WHERE Lesson IN ('Roman History','European History') |
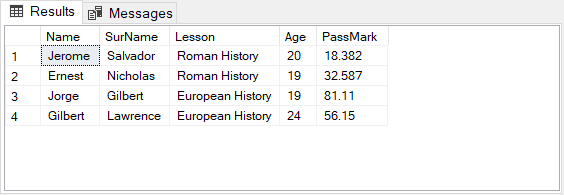
The BETWEEN operator filters the data that falls into the defined begin and end value. The following query returns data for the students whose marks are equal to and bigger than 40 and smaller and equal to 60.
1 2 3 | SELECT * FROM Student WHERE PassMark BETWEEN 40 AND 60 |
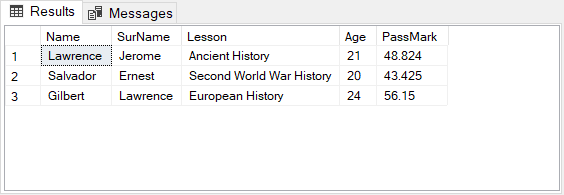
Sorting the Data: ORDER BY Statement
ORDER BY statement helps us to sort the data according to the specified column. The result set of the data can be sorted either ascending or descending. ASC keyword sorts the data in ascending order and the DESC keyword sorts the data in descending order. The following query sorts the students’ data in descending order according to the PassMark column expressions.
1 2 3 | SELECT * FROM Student ORDER BY PassMark DESC |
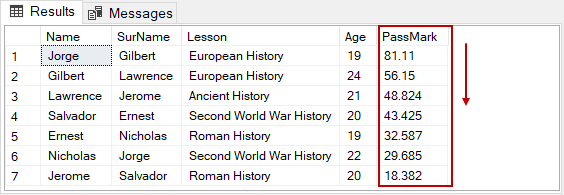
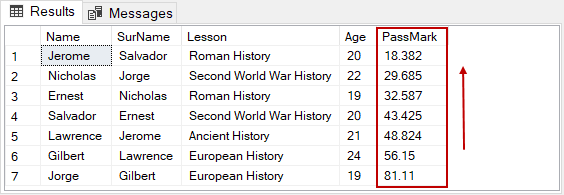
By default ORDER BY statement sorts data in ascending order. The following example demonstrates the default usage of the ORDER BY statement.
1 2 3 | SELECT * FROM Student ORDER BY PassMark |
Eliminating the Duplicate Data: DISTINCT Clause
The DISTINCT clause is used to eliminate duplicate data from the specified columns so the result set is populated only with the distinct (different) values. In the following example, we will retrieve Lesson column data, however, while doing so, we will retrieve only distinct values with the help of the DISTINCT clause
1 2 3 | SELECT * FROM Student WHERE Age >= 20 |
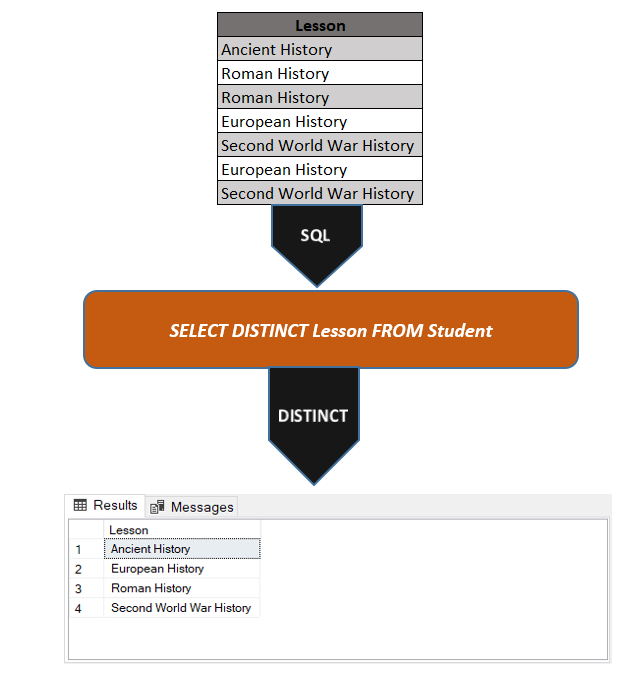
As we can see, the DISTINCT clause has removed the multiple values and these values added to the result set only once.
Quiz
In this section, we can test our learnings.
Question – 1:
Write a query that shows student name and surname whose ages are between 22 and 24.
Answer :
1 2 3 4 | SELECT Name, SurName FROM Student WHERE Age BETWEEN 22 AND 24 |
Question – 2:
Write a query that shows student names and ages in the descending order who takes Roman and Ancient History lessons.
Answer :
1 2 3 4 5 6 | SELECT Name, SurName, Age FROM Student WHERE lesson IN('Roman History', 'Ancient History') ORDER BY Age DESC |
Conclusion
In this article, we learned how we can write the basic SQL queries, besides that we demonstrated usage of the queries with straightforward examples.

Post a Comment